 Save on Pinterest
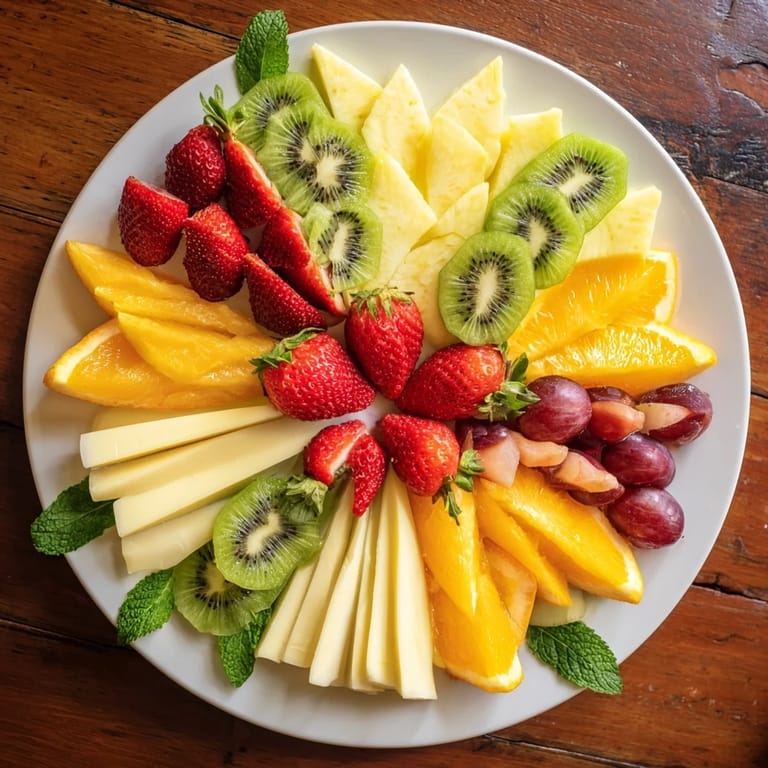
 My friend Sarah called me in a panic two hours before her gallery opening, asking if I could bring something that would make her appetizer table actually memorable. I'd just bought a stunning round marble board from an estate sale, and suddenly the idea hit me like a lightning bolt: what if I arranged fruit and cheese not just by flavor, but by color and geometry, creating something that would catch people's eyes from across the room? Twenty-five minutes later, I was placing ruby grapes next to pale cheddar wedges, watching the pattern emerge like a spiraling kaleidoscope. That night, guests spent half the evening just admiring the platter before eating anything.
I made this for my mom's book club, and something unexpected happened: instead of people diving straight into eating, they actually sat there studying the pattern like it was a puzzle. One woman started pointing out how the colors repeated, another noticed I'd hidden the blueberries in the gaps like tiny treasures. That's when I realized this wasn't just about the flavors anymore, it was about creating a moment of genuine delight before anyone even tasted a thing.
Ingredients
- Red grapes: The jewel tones are non-negotiable for visual impact, and they stay firm for hours, which means your pattern won't collapse before guests arrive.
- Strawberries: Halving them shows off that gorgeous red interior and cuts down the visual heaviness that whole berries can create.
- Kiwi wedges: The bright green is practically neon under party lights, and the seeds create this beautiful natural texture that photographs beautifully.
- Pineapple wedges: Choose the most golden yellow pieces, because pale ones can make your kaleidoscope feel washed out.
- Blueberries: These are your secret weapons for filling gaps and adding depth where the pattern might have empty spaces.
- Orange segments: They bridge the gap between warm and cool tones, and their natural shape adds variety to the geometry.
- Aged cheddar: This firm cheese cuts into clean wedges without crumbling, and the pale gold color anchors your color palette.
- Manchego: It's sturdy enough to hold a wedge shape through transport, and the slightly nutty flavor adds sophistication.
- Brie: Softer cheeses demand chilling beforehand, otherwise they'll collapse into your pattern and ruin the geometry.
- Goat cheese: Slicing it into rounds gives you a different shape to work with, creating visual rhythm through variety.
- Fresh mint: Just a few leaves tucked between sections adds a green thread that makes the whole thing feel intentional and finished.
Tired of Takeout? 🥡
Get 10 meals you can make faster than delivery arrives. Seriously.
One email. No spam. Unsubscribe anytime.
Instructions
- Prep everything first, nothing leaves the cutting board until you're ready:
- Wash your fruits and get them cut into uniform pieces, trying to keep wedges roughly the same size so the pattern doesn't look accidental. Chill the cheeses for at least an hour before cutting, so they hold their shape without shattering.
- Map your color flow before placing anything:
- Spend two minutes just looking at your platter and imagining how you want the colors to travel around the circle. I usually think of it like a pinwheel, where each "arm" contains the same sequence of colors repeating outward.
- Start at the edge and spiral inward or outward, your choice:
- Pick one fruit or cheese and place wedges around the outer edge at even intervals, then fill in between with a different variety. The repetition is what creates the kaleidoscope effect, so consistency matters more than perfection.
- Build concentric rings if your platter is large enough:
- Once your outer circle is complete, create another ring inside it with a different color sequence, then keep spiraling inward. This depth is what makes people actually pause and study the board instead of just grabbing snacks.
- Use blueberries and grapes to plug the gaps:
- Those little spheres are forgiving and flexible, they nestle into awkward spaces and add visual complexity. Step back frequently and look at the overall color balance rather than obsessing over individual placement.
- Tuck mint between sections and serve with confidence:
- Just before serving, scatter a few mint leaves around the board for a pop of green and a suggestion of freshness. If you're transporting it, cover it loosely and keep it cool, the arrangement will stay picture-perfect.
 Save on Pinterest
 The moment that sealed this recipe for me was watching a five-year-old tilt her head and go absolutely silent while looking at the board, like she'd discovered something magical. That's the magic of making food that feeds both the eyes and the stomach, where the presentation becomes part of the memory.
Color Theory That Actually Matters
I learned the hard way that not all colorful platters are actually beautiful, some look chaotic because the colors don't dance together. Cool tones like blueberries and kiwi need warm tones like strawberries and cheddar to sing, otherwise everything blends into a muddy party platter. Think of it like creating a sunset on your board, where colors transition naturally and your eye knows where to look next.
Transport and Timing Secrets
I once drove forty minutes with this platter only to arrive and discover the brie had softened into a useless puddle, which meant starting over in someone's tiny kitchen. Now I prep everything that needs chilling at the event location, or I transport cheeses and fruits separately and assemble on-site if it's an important gathering. The actual assembly takes twenty-five minutes anyway, so you might as well build it right before people see it and everything is at its prime.
Making It Your Own
The beauty of this concept is that it works with whatever fruits and cheeses are looking good at your market on any given week. I've made versions with blood oranges and burrata in winter, stone fruit and fresh mozzarella in summer, and once even threw in pomegranate seeds and fig jam for a darker, moodier palette. The structure is flexible enough to follow your seasons and your cravings while maintaining that eye-catching geometry everyone will love.
- Swap seasonal fruits freely, just maintain a mix of colors so the pattern stays visually interesting.
- Add nuts or olives in gaps for savory notes that elevate the whole experience.
- Consider edible flowers tucked into the pattern for an extra touch of elegance.
 Save on Pinterest
 This platter has become my answer to the impossible question: what do you bring when you want to contribute something meaningful without cooking for hours? It's made of the simplest ingredients, but somehow it's always the thing people remember.
Recipe Questions & Answers
- → What types of fruit work best for this platter?
Seedless grapes, strawberries, kiwi, pineapple, blueberries, and segmented oranges provide a mix of colors, textures, and flavors that enhance the visual appeal.
- → How should the cheeses be prepared for the platter?
Cheeses like aged cheddar, Manchego, brie, and goat cheese are sliced into matching triangular wedges or rounds to complement the fruit arrangement.
- → Can I substitute any fruits or cheeses?
Yes, seasonal fruits and different assortment of cheeses can be used to customize flavors and appearance to your preference.
- → What is the best way to arrange the platter?
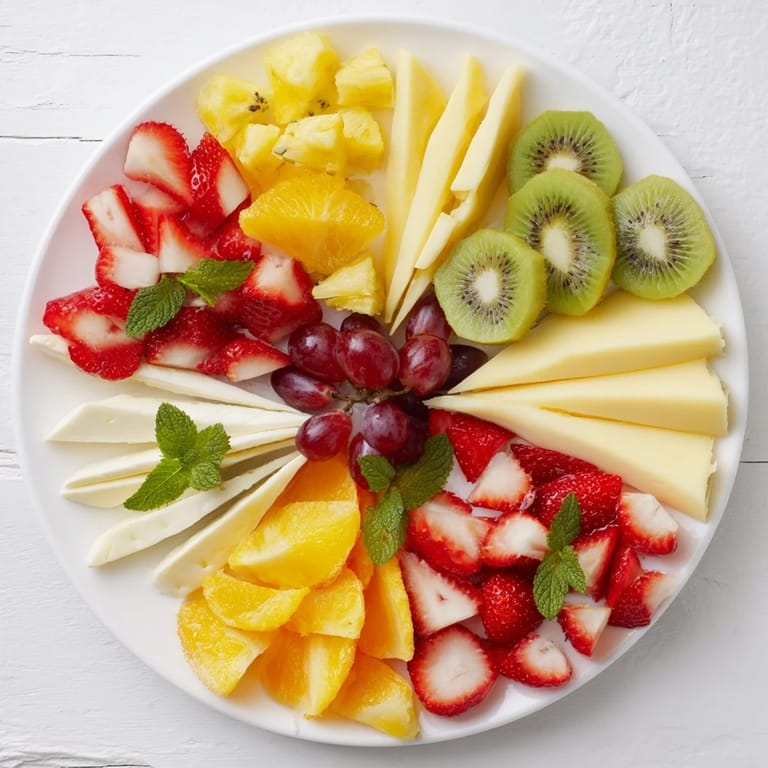
Alternate fruit wedges with cheese slices in concentric circles on a large round platter, ensuring color and shape symmetry for a striking kaleidoscope effect.
- → Are there garnishing options to enhance the platter?
Fresh mint leaves add color and aroma, while optional additions like olives or roasted nuts can provide savory contrast.
- → How far ahead can this platter be prepared?
It can be assembled shortly before serving or covered and refrigerated to maintain freshness until needed.