 Save on Pinterest
 My neighbor knocked on the door in early March with a mischievous grin, asking if I could whip up something fun for her St. Patrick's Day party the next weekend. She wanted edible gold, she wanted festive, and she wanted people to actually enjoy eating it—not just admire it on a plate. That's when pot of gold cake pops popped into my head: they're whimsical, they're shareable, and honestly, watching people's faces light up when they bite into that chocolate center never gets old.
I made these for the first time on a rainy Saturday morning, the kind where the kitchen smells like chocolate and butter and the whole day feels slower than usual. My daughter wandered in halfway through and grabbed one of the cake balls before I could refrigerate them—it was still warm, slightly soft, and she declared it better than any store-bought candy she'd ever had. That single moment told me I was onto something good.
Ingredients
- 1 box (400 g) chocolate cake mix: This is your foundation, and honestly, using a box mix here is not cheating—it guarantees consistent moisture and flavor so you can focus on making the decorating shine.
- 120 g (½ cup) chocolate frosting: The glue that holds everything together; it should be soft enough to blend smoothly but not so warm it turns everything into soup.
- 400 g (14 oz) black candy melts: The star of the show, creating that shiny pot effect that catches the light beautifully.
- 48 g (2 oz) gold sprinkles or edible gold pearls: These are what make people gasp; don't skimp on the quality here because they're doing all the visual heavy lifting.
- 24 lollipop sticks: Wooden ones work best and feel more special than plastic alternatives.
- 50 g (1.75 oz) white candy melts (optional): Perfect for piping a delicate rim that gives each pot dimension and sophistication.
- Green fondant or sprinkles (optional): A tiny shamrock accent on top ties the whole St. Patrick's Day theme together.
Tired of Takeout? 🥡
Get 10 meals you can make faster than delivery arrives. Seriously.
One email. No spam. Unsubscribe anytime.
Instructions
- Bake and cool your chocolate cake:
- Follow the package directions exactly and let the cake rest at room temperature until it's completely cool—this prevents the frosting from melting when you mix them together. Warm cake is the enemy of perfectly shaped pops.
- Create the cake ball mixture:
- Crumble the cooled cake into a large bowl until it resembles wet sand, then fold in the chocolate frosting gently until the mixture holds together like cookie dough. This is where you get to use your hands and feel when the texture is just right.
- Roll and shape:
- Scoop the mixture using a small cookie scoop (about 1.5 inches) and roll each piece between your palms into a smooth ball, then flatten the top slightly so it looks like a tiny pot. Chill these on a parchment-lined tray for at least 30 minutes—patience here makes the next steps so much easier.
- Prepare your coating:
- Melt the black candy melts in a microwave-safe bowl in 30-second bursts, stirring between each one until completely smooth and glossy. Don't overheat or the candy will become thick and gloopy.
- Secure the sticks:
- Dip just the tip of each lollipop stick into the melted candy and push it halfway into each cake ball, then refrigerate for 10 minutes so the chocolate sets and holds the stick firmly in place. This step is crucial and worth the wait.
- Dip and decorate:
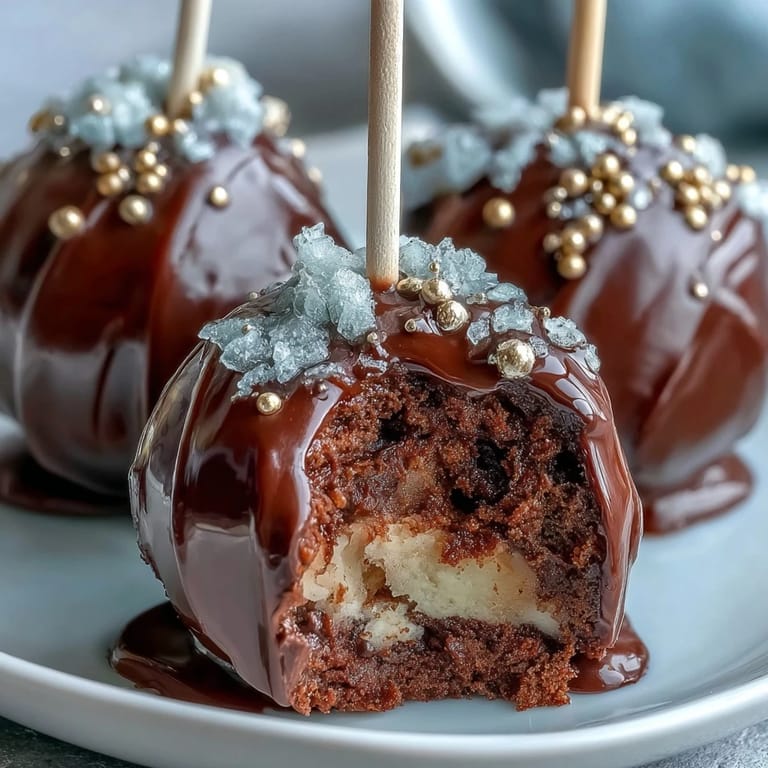
- Working with a few pops at a time, dip each one completely into the black candy, rotating gently to coat evenly and letting the excess drip back into the bowl. Before the coating sets (within 5 seconds), shower the top with gold sprinkles while the candy is still tacky.
- Add finishing touches:
- Once the black coating sets, you can pipe a thin line of white candy around the rim of each pot for elegance, or add a tiny green fondant shamrock on top if you're feeling fancy. Let everything set completely before handling or serving.
 Save on Pinterest
 At my neighbor's party, these little pots of gold disappeared faster than I'd made them, and three different people asked me to bring them to their own celebrations that month. There's something magical about food that makes people smile before they even taste it.
Mastering the Dipping Technique
The dipping moment is where everything comes together, and it's honestly easier than it looks once you do it twice. Keep your candy melts at a consistent temperature—too hot and the cake ball slides right off the stick, too cool and it creates a thick bumpy coating. I learned to use a small offset spatula to support the cake pop from underneath as I lift it out of the candy, which prevents any unfortunate accidents.
Storage and Make-Ahead Magic
These cake pops are forgiving when it comes to timing, which makes them perfect for party planning. You can bake the cake two days ahead, refrigerate the unbaked pops for up to 24 hours, or even freeze the fully decorated ones for up to two weeks in an airtight container. On the morning of your event, let them sit at room temperature for 30 minutes and they'll taste freshly made.
Variations and Personal Touches
Once you understand the basic method, you can customize these endless ways that make them truly yours. I've seen them made with vanilla cake and caramel frosting, topped with copper sprinkles instead of gold, or with red candy melts instead of black for a completely different holiday vibe. The foundation is flexible enough that you can build on it without losing what makes them special.
- Try swapping the chocolate frosting for peanut butter or cream cheese for a completely different flavor profile.
- If you can't find edible gold pearls, metallic dust mixed with a tiny bit of coconut oil creates an equally stunning effect.
- Always keep extra candy melts on hand because you'll inevitably use more than you expect.
 Save on Pinterest
 Every time I make these, I'm reminded that the best desserts are the ones that people remember not just for how they taste, but for how they made everyone feel. These little golden pots have a way of doing exactly that.
Recipe Questions & Answers
- → How do I achieve the smooth black coating on the cake spheres?
Melt black candy melts slowly over low heat or using a microwave in short bursts, stirring frequently. Dip each sphere fully and let excess drip off before setting upright.
- → Can I prepare these treats without using store-bought frosting?
Yes, homemade chocolate frosting or ganache can be used to bind the cake crumbs for a fresh, personalized touch.
- → What is the best way to keep the decorative gold sprinkles in place?
Apply gold sprinkles immediately after dipping while the coating is still wet to ensure they adhere firmly.
- → Is it possible to add additional decorations like green accents?
Yes, small shapes made from green fondant or green sprinkles can be added for festive shamrock touches before the coating fully sets.
- → How should these chocolate treats be stored?
Store them in an airtight container at room temperature for up to three days to maintain freshness and texture.