 Save on Pinterest
 Last summer, a friend challenged me to create a dessert that didn't feel like a compromise—something genuinely delicious that also packed protein and didn't require an oven. These cheesecake cups were born from that moment, and they've become my go-to when I want something that satisfies both cravings and fitness goals without the guilt. The beauty is how simple they are, almost deceptively so, given how impressive they taste when you bite into that creamy filling and hear the crust crunch beneath your teeth.
I made a batch for my sister's book club gathering, nervous they'd feel too "diet-y" in a room of people eating regular cheesecake. Instead, someone asked for the recipe before dessert was even finished, and two others wanted to know if I could make them weekly. That's when I realized these weren't just a personal win—they were secretly crowd-pleasing enough to serve at any gathering without explanation or apology.
Ingredients
- Oat flour: This is the foundation, creating a wholesome, slightly nutty base that holds everything together without requiring any baking.
- Almond or peanut butter: Acts as the binder and adds richness—don't skip it even if you're tempted to cut fat elsewhere.
- Honey or maple syrup: Just enough sweetness in the base to complement the cheesecake without making it cloying.
- Cream cheese: Use softened, reduced-fat versions; cold cream cheese will stay lumpy no matter how hard you beat it.
- Greek yogurt: The secret ingredient that adds protein, creaminess, and a subtle tang that prevents the filling from tasting one-dimensional.
- Vanilla whey protein powder: Two scoops gives you the protein boost without any grittiness if you mix thoroughly.
- Lemon zest: Optional but transformative—a tiny amount brightens everything without making it taste like lemon dessert.
Tired of Takeout? 🥡
Get 10 meals you can make faster than delivery arrives. Seriously.
One email. No spam. Unsubscribe anytime.
Instructions
- Make the base:
- Combine oat flour, almond butter, honey, and salt in a bowl, mixing until the texture resembles damp sand that holds together when squeezed. This happens faster than you'd expect, usually within a minute or two of stirring.
- Pack it down:
- Distribute the mixture evenly among six muffin liners, pressing firmly with the back of a spoon until it's compact and level. Wipe excess crumbs from the sides of each liner so the finished cups look clean.
- Prepare the filling:
- Beat softened cream cheese until smooth and almost fluffy, scraping the bowl halfway through to catch hidden lumps. Add Greek yogurt, protein powder, honey, vanilla, and lemon zest, mixing on low speed until no streaks remain—overbeating can introduce unwanted air bubbles.
- Layer it up:
- Spoon the cheesecake mixture over each base, dividing evenly and smoothing the tops with a spatula for an even appearance. The filling will be soft but stable at this stage.
- Top and chill:
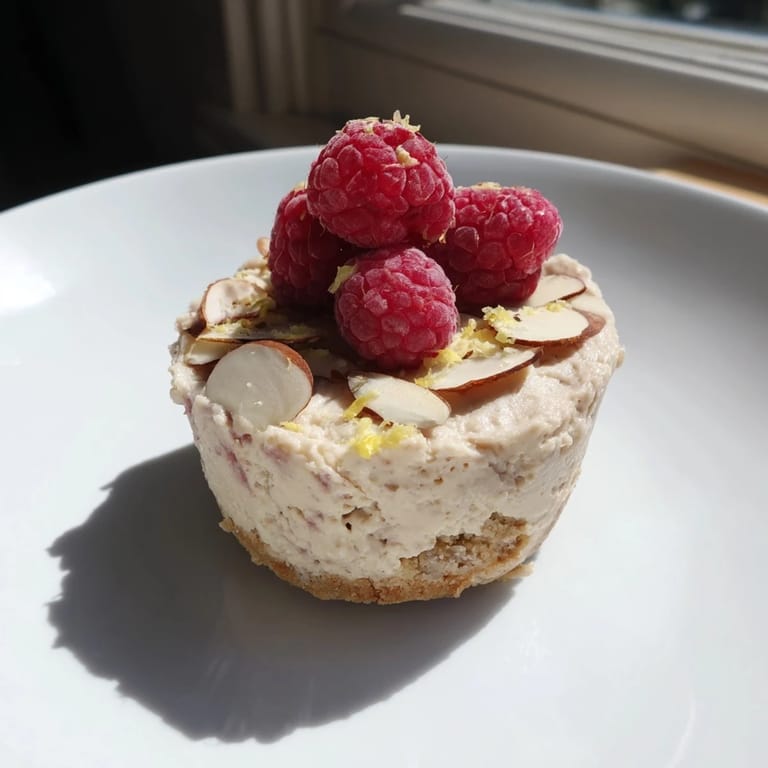
- Add your chosen toppings now—fresh berries, chopped nuts, or dark chocolate shavings—pressing gently so they don't slide off. Refrigerate for at least two hours until the filling sets firmly and holds its shape when you lift a cup from its liner.
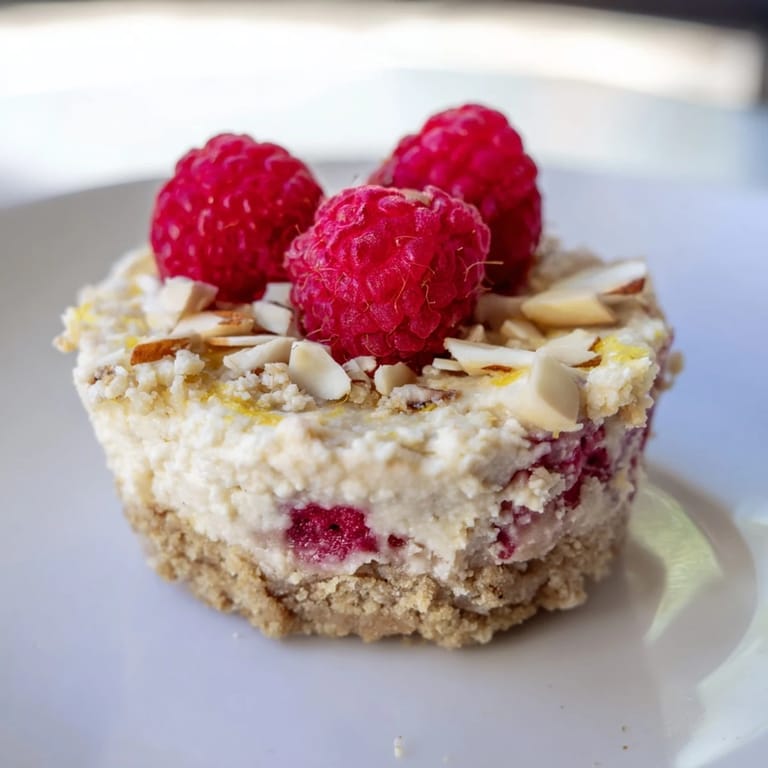
 Save on Pinterest
 The moment someone pulled their cup from the muffin liner for the first time and that crust gave way to the creamy filling, I saw why these little things work so well—they're substantial enough to feel like real dessert, but light enough that eating one doesn't derail your day. There's something deeply satisfying about a treat that aligns with what your body actually needs.
Base Variations That Work
Once you nail the basic formula, the crust becomes your playground. I've swapped in crushed almond flour for a more delicate, lighter crumb, and I've also crumbled two or three gluten-free digestive cookies into the mix for a texture closer to traditional cheesecake. Regardless of what you choose, the ratio stays roughly the same—just enough binding agent and sweetness to hold it together without overwhelming the filling above.
Flavor Explorations That Elevate Everything
Lemon zest was my first adventure beyond vanilla, and it opened my eyes to how a whisper of brightness can transform something from good to memorable. Then I tried adding half a teaspoon of instant coffee powder to the filling—it doesn't make it taste like coffee, just deepens the cheesecake flavor in ways that feel almost impossible to name. The beauty of this recipe is its restraint; small additions create noticeable shifts without demanding major overhauls.
Storage, Toppings, and the Finale
These cups keep beautifully in the refrigerator for up to four days in an airtight container, and they're actually better on day two or three when the flavors have settled and deepened. Fresh berries are my standard topping because they stay fresh longer than you'd expect and add natural tartness, but don't hesitate to pile on chopped pistachios, dark chocolate shavings, or even a drizzle of nut butter sauce.
- Freeze individual cups for up to two months; they thaw in the fridge overnight and taste virtually identical to fresh-made ones.
- A simple berry compote made with frozen berries, a touch of honey, and a squeeze of lemon juice transforms these from snack to celebration.
- Serve slightly chilled rather than straight from the cold fridge for the most creamy, dreamy texture.
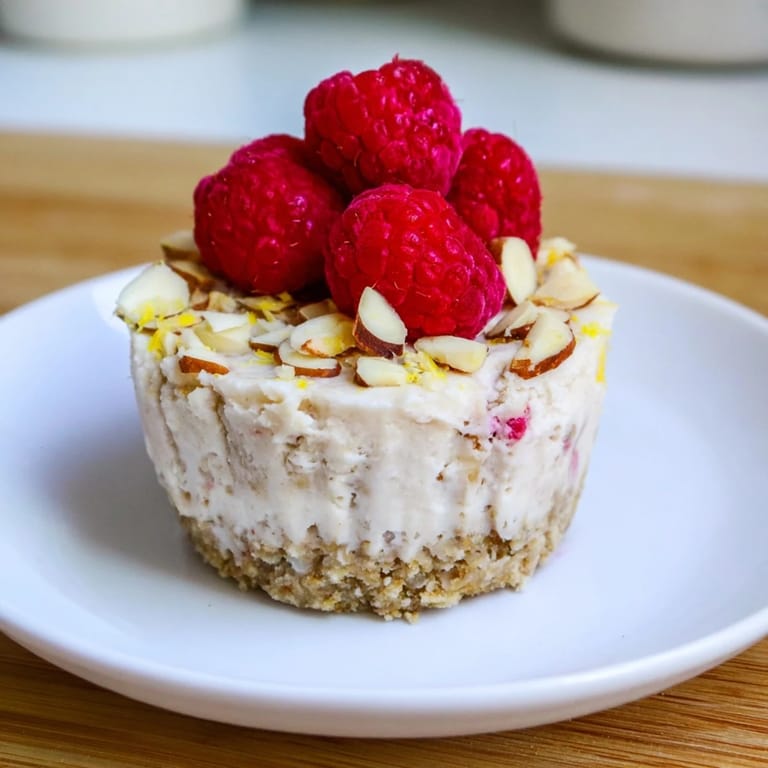
 Save on Pinterest
 These little cups represent everything I love about cooking for myself and others: simple ingredients, real nutrition, and genuine joy in every bite. Make them, customize them, and watch them disappear.
Recipe Questions & Answers
- → What can I use to make a gluten-free base?
Replace oat flour with almond flour or crushed gluten-free cookies to create a gluten-free crust.
- → Can I substitute the sweetener in the base or filling?
Yes, honey can be swapped for maple syrup for a different natural sweetness.
- → How long should the cups chill before serving?
Chilling for at least 2 hours allows the filling to firm up and creates the ideal texture.
- → Is it possible to make these dairy-free?
Use dairy-free cream cheese, plant-based yogurt, and a vegan protein powder to keep it dairy-free.
- → What toppings complement these cheesecake cups?
Fresh berries, chopped nuts, or dark chocolate shavings add texture and flavor variety.
- → Can the base be made without nut butter?
The nut butter helps bind the base, but sunflower seed butter can be used as an alternative for nut-free options.